Translated by Nick R
Picture a perfect day for tending to your garden, doing some pruning, transplanting, watering, and so on. Naturally, you’d need a couple of tools to help you carry out these activities; however, as you pick them up, you notice that they are dirty, rusty, and in very poor condition.
Would you use them anyway? Would you risk your plants to disease? Or would you rather spend a lot of money on new tools instead of protecting and caring for those you already have? Pretty sure the answer is NO.
In a previous blog, we explained how vital to keep your garden tools clean and well maintained is. For this, they must have a space of their own where they can be stored and protected from the environmental factors that contribute to their deterioration.
So in this blog, we’ll guide you through building that ideal cabinet or storehouse so you can have your garden tools organized, clean and safe from sun exposure and rain.
We’ll start by talking about the different materials that exist to build tool cabinets. Then, we’ll mention the necessary materials to build yours, and finally, we’ll give you a step-by-step guide.
Table of Contents
Types of garden tool cabinets
As we have already mentioned, a tool cabinet is necessary to protect your tools, and depending on where you live, have it indoors or outdoors.
In case you’re locating the cabinet outdoors, it should be made of a material resistant to such an environment. Otherwise, it may get damaged and thus not fulfill the purpose of protecting the tools.
There are 3 materials you can consider when buying or making your cabinet. These come in different sizes, shapes, colors, and capacities, so you can choose from a wide variety to buy or make yours.
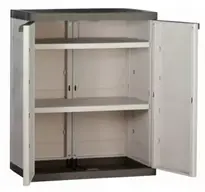
Resin cabinet
This is a synthetic material that requires no maintenance. Clean it with soap and a damp cloth, wipe it with another and clean thoroughly.
As their function is to serve as organizers, these cabinets can be used anywhere in your home beyond garden tools. They’re rainproof and resistant to UV, which makes them durable and perfect for the outdoors.
Other reasons to buy one are their accessible price and ease of assembly. You can customize the shelves inside the cabinet to fit your needs and make space for your tools, as some of them are bigger than others.
Cabinets come in different styles, colors, shapes, and sizes.
There are tall cabinets that may have 1 or more doors with various divisions inside and shelves or racks. Some have safety locks with padlocks because, remember, that any curious child at home could open the tool cabinet and get injured by one of your tools.

Also, there are low cabinets with 1 or more doors with interior partitions, which can be hung on the wall in case you don’t have much room in your house or garden.
Metal cabinet
These cabinets can be made of steel or aluminum as they are anti-corrosive and fireproof materials, meaning non-flammable. Metal cabinets can be placed outdoors as they withstand humidity, corrosion, and extremely high or low temperatures.
If you want them to last even longer, you can apply regularly a coat of antirust paint or varnish. Another advantage is that they are easy to clean. These can have 1 or more doors as well as safety locks.

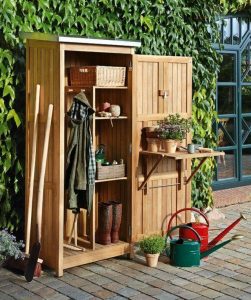
Wooden cabinet
Wood is often used to build different structures or furniture. In other blogs we’ve talked about making vegetable gardens with wood: a material that lasts for many years and provides a beautiful style to your garden.
This also applies to a cabinet to store your tools and protect them properly. You can choose to either keep the natural look of the wood or paint it with a coating that protects it from the outside.
Pinewood is the most advisable for such structures, but you must apply a varnish that will help prevent the appearance of insects and problems caused by the environment.
You should check your wooden cabinet periodically. Even if it’s protected, it’s still very vulnerable to extreme climatic factors. Therefore, you can take the appropriate measures, such as reinforcing the varnish or even changing the cabinet.
Unlike when using other materials, you may create an exclusive design for your cabinet in the exact dimensions you need. Other cabinets, despite having different sizes, will always be of a standard size and may not fit into the space you have.
Materials for building your cabinet
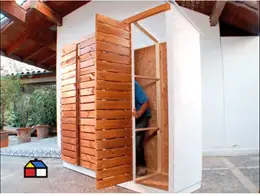
You already know a little more about the most common materials to create a closet. Now I want to show you how to build your own, and this time we’ll make it out of wood.
This will be a large cabinet: 2 m (6 ft) tall at the front, 1.80 m (6 ft) tall at the back, 2.44 m (8 ft) long and 52 cm (18 in) wide, and 4 compartments. Of course, you can make it smaller depending on your needs and based on what I’m about to explain.
Here are the materials you need to build your closet.
- 4 OSB (Oriented Strand Board) boards 11.1 mm thick.
- 27 brushed pine boards 2,44 m (8.44 ft) long x 10 cm (4 in) wide x 2 cm (2 in) thick
- 20 brushed pine boards, 2.44 m (8.44 ft) long x 7 cm (2.44 in) wide x 2 cm (2 in) thick
- 1 5/8″ coarse thread wood screws
- 3 0.5 mm corrugated polycarbonate sheets
- Self-drilling screws
- 8 32 mm piano hinges
- Larch matt water-based stain (wood protector)
- White matte water-based enamel
- Brushes
- Paint tray
- Wireless drill
The first recommendation is to make the cuts once you have a clear picture of the measurements you’ll need for your cabinet or storage room. At times, the store where you bought the materials may have the service of cutting them to size.
This will make it easier for you to assemble the cabinet since you probably don’t have the necessary and adequate tools at home to make the cuts, edges, profiles, joints, etc.
How to build the cabinet or storehouse for your tools?
Now that you know the materials you need to build your cabinet, let’s get down to work on the steps to follow to achieve it.
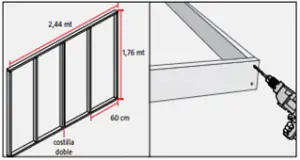
Step 1. Assembling the back of the cabinet
The back frame is going to be 20 cm (8 inches) shorter than the front: 6’6″ (1.80 m). That’s because we want a slope at the top of the closet.
Take 6 of the 2 cm thick x 1.76 m long brushed pine boards for the sides and 2 of the 2 cm thick x 2.44 m longboards for the top and the base.
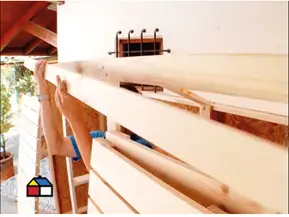
Join them together using 1 ⅝” screws and allowing 60 cm (2 ft) of space between the sides. The side that will be in the middle must be double, this means that you’ll use 2 boards of the same length together, as shown in the image below, to make it easier to fix the cladding.
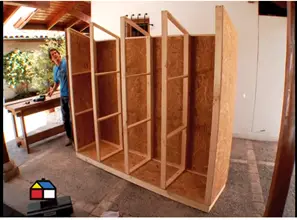
Step 2. Building the frames
In this step, you’re going to assemble the inside partitions. There will be 5 frames, each with a board 2 cm thick x 7 cm wide x 1.80 m long for the back part and another 2 cm thick x 7 cm wide x 2 m long for the front side.
The divisions for each frame will be 4 boards 2 cm thick x 7 cm wide x 48 cm long. Join them together with the 1 ⅝” screws. This means there will be 3 spaces per frame, as you can see in the following image.


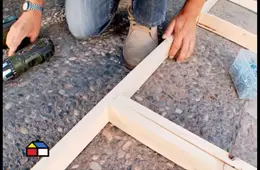
Step 3. Construction of the base or platform of the cabinet
The cabinet will be assembled on this structure. You’ll use brushed pine boards 2.44 m long x 10 cm wide x 2 cm thick. Take 2 boards 2.44 m long for the edges, and cut 7 boards 57 cm long for the middle divisions.
Join them together with the 1 ⅝” screws, and when ready, cover it with a 2.44 m long x 61 cm wide piece of OSB, meaning that you’re going to cover the floorboard surface with OSB. Tighten it with the screws, and the closet floor will be ready.
The 7 boards you have cut have a width of 57 cm (2 ft.), and the other 2 end boards have a thickness of 2 cm (1 in.) each. This allows for completing the 61 cm (2 ft.) needed for the OSB to cover the base of the closet.


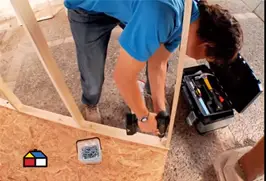
Step 4. Attaching the back and frames to the base.
Once the cabinet base is ready, you’ll attach the back of the cabinet to the base using the 1 ⅝” screws. Then, you’re going to attach the frames to the base and to the back of the cabinet with the screws.
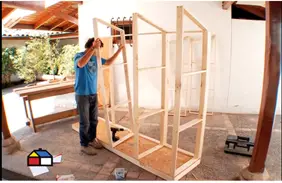
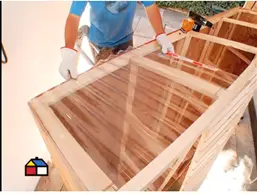
Once you’ve fixed everything very well, you’re going to cover the back and sides with OSB. Use two 1.80 m (6 ft.) high x 1.22 m (4 ft.) longboards to cover the back of the cabinet and 2 sheets 61 cm (2 ft.) wide x 2 m (6″) high to cover the sides.
Don’t forget to leave a slope on the roof. You’ll have to make a diagonal cut on the surface of the side panels so that they match the measurements of the 1.80 m (6 ft.) high back panel.
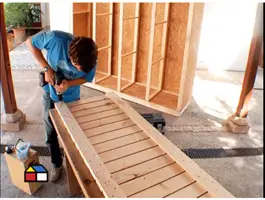
Step 5. Construction of the doors
The doors will be made with a technique called Treillage, which stands for tangled or lattice wood. There will be 4 doors with 2 widths: 61 cm (2 ft.) for the end doors and 54 cm (2 ft.) for the center doors, all of them will be 1.90 m (4 ft.) high.
For a Treillage, you’ll use 2 brushed pine boards 2 cm (0.8″) thick x 10 cm (4″) wide x 1.90 m (6ft.) long for the frame sides of each door (8 boards in total, as there are 4 doors) and 18 boards 2 cm (0.8″) thick x 10 cm (4″) wide x 54 (21″) or 61 cm (24″) long, depending on the width of the doors. Remember that the 2 doors on the edge are 61 cm (24″) wide, and the middle ones are 54 cm (21″).
These 18 boards will be placed horizontally on one face of each door to create a decorative view and cover the interior. Allow a 1 cm (0.3″) space between each board and fasten them with the 1 ⅝” screws.
One helpful tip is to put the screws from the inside so that they are not visible from the cabinet outside.

There will be a space at the top of the cabinet front for 2 boards, one above the other, measuring 2 cm (0.8″) thick x 10 cm (4″) wide x 2 m (6″) long. These boards serve as a lintel or beam to cover the opening (empty space) of the outer doors on the front of the cabinet.
Step 6. Roof positioning
For assembling the roof, you’ll use 3 sheets of polycarbonate, which is a material resistant to bumps, that doesn’t warp under heat, with a UV filter and insulation.
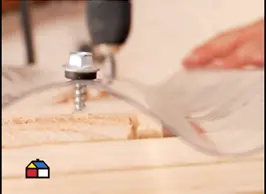
Place the sheet on top of the cabinet, leaving 2 cm (0.8″) extra at the back and 5 (1.9″) more in the front: this will guide you when cutting the sheets to the exact size. After the sheets are ready, adjust them to the wood with the self-drilling screws.
Step 7. Painting the doors and the exterior of the cabinet
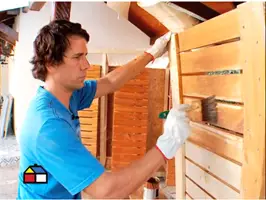
You’ll start by painting the doors with matte water-based stain. That will help prevent deterioration from moisture, block the sun, and act as a fungus and insect repellent.
First, paint the 2 sides of the door (front and back), wait for 1 hour to dry, and then wait 2 more hours to apply a second coat. Then you paint the lintel or beam with the Stain, and wait for the same time.
For the exterior face of the frames, the pallet base, the exterior sides, and the back of the cabinet, paint with exterior white matte water-based glaze.

Step 8. Door installation
To attach the doors to the cabinet using 32 mm (1.2″) hinges on each door top and bottom, meaning, 2 hinges per door.
At both ends, place the 61 cm (24″) wide doors, and the 54 cm (24″) wide doors in the center. The latter is narrower because they need space to open without colliding with the end doors.
Finally, you can add inside organizers, shelves, and so on to place your tools or whatever you need to store; it works to store anything you need.

As you could notice, building a cabinet or storage room for your garden tools is very simple. You don’t need a lot of materials and they are easily obtainable. Moreover, this first-class cabinet will allow you to keep your gardening tools protected and always in good condition.
Do not hesitate to build yours. Remember, that you can make it in different sizes. It all depends on the space available and what you need to store. Let’s get to work!