No doubt you have seen some beautiful plants and have wanted to grow one in your garden or multiply one you already have without having to sow it and do the whole planting from scratch.
The truth is that there are several methods to reproduce and multiply those plants that you like so much. However the most known is by seeds, there is another method that allows a much faster vegetative multiplication and is highly recommended.
This method is known as reproduction by cuttings, and if you follow some tips when putting it into practice, you’ll have great results. It’s for this reason that, in this blog, I want to talk about propagation by cuttings.
You’ll learn what this method entails, some fundamentals for you to decide whether to use it, the techniques, the conditions that must be considered, and how to take care of your cuttings.
Table of Contents
What is propagation by cuttings?
The reproduction method is a way to multiply your plants in a simple, economical, and more efficient way. It can be used for herbaceous or woody plants and gives remarkable results within a short time.
Unlike seeds, which usually need to be sown in the spring, cuttings can be reproduced throughout the year. In addition, one of the main advantages of this method is that the new species will grow with identical features to those of the mother plant, which is not the case with seeds.
Reproduction by cuttings consists of extracting a part of the plant, such as a branch, stem, roots, leaves, or other organs, so as to grow a new plant. This process must be done under certain parameters regarding the type of substrate, irrigation, light, etc. We’ll go further into these concepts later on.
Characteristics of reproduction by cuttings
Now that you know what the method of reproduction by cuttings consists of, I want to explain some characteristics that will help you decide more confidently whether to implement it in your garden.
Why choose this method?
Vegetative propagation by cuttings takes advantage of totipotency. This refers to the capacity of plant cells to replicate into a new one on their own. For this process, suitable parts of the plant, such as branches, stems, leaves, or roots, are taken from the mother plant.
Thanks to this, the new plants grow faster, in abundance, and economically and practically. Most of the time, they can even flower earlier than the plants planted by seeds.
Where to take the cuttings from?
This is the first step for this method, and as I mentioned already, the cuttings must be taken from the mother plant. These should be healthy and in proper vegetative conditions.
If the mother plant is not in optimal conditions, cuttings taken from them will have inferior root development. It’s, therefore, necessary to ensure proper maintenance for every plant.
As you know, factors such as watering, temperature, humidity, nutrients, location, light, and so on are key to the proper development of all plants. So before taking cuttings, make sure the mother plant is vigorous and healthy.
You may take cuttings from the leftovers of pruned plants. For example, for herbaceous plants, you can prune in winter, take the cuttings and plant them in spring.
Once you have collected the cuttings, it’s wise to label them so that you recognize what species they belong to. Also, if you take several cuttings, it’s advisable to leave them apart as you proceed to plant them.
When to take the cuttings?
The best time to take cuttings is when the plant has reached a suitable time and stage of growth. This will naturally depend on each plant species; as an example, conifer cuttings (trees or shrubs) can be taken in winter.
Keep in mind that the time of day also influences the taking of cuttings. If you live in cool areas, you can take them at any time of the day. However, in areas with high temperatures but low humidity, it’s best to take the cuttings in the morning.
How can you store cuttings?
It’s always necessary to store the cuttings after taking them from the mother plant, at least for a brief time, in a cool, humid place. In case the cuttings are at a high temperature, you can dip them in cold water for a few seconds and dry them thoroughly to avoid fungi when storing them.
There’s some risk of rotting the cuttings if you store them damp, so make sure this is not the case. Do not put them outdoors to prevent them from wilting, only in case of high humidity and poor aeration.
You can store the cuttings in terracotta or plastic containers, a tip is to wash and disinfect the containers very well before storing the cuttings.
Initial recommendations
By now, you should be aware of the several factors that must be considered so that the cuttings can develop properly, especially the roots. Some of these factors are; the light to which they will be exposed, a constant temperature, and adequate substrate and ambient humidity.
Clearly, they vary according to the plant species to be reproduced. In addition, the mother plants also need to be in the best conditions for taking cuttings from them.
Avoid taking too small cuttings as they won’t be able to root easily. The substrate should drain well and have good aeration and water absorption. It’s essential to remove the flowers and buds of the flowering plants’ cuttings.
The reason is that, if you don’t do so, the cuttings will struggle to produce more fruits and seeds, and thus disregard the formation of roots and buds. You can use rooting agents to speed up the process.
Tools for propagating cuttings
In our blog about garden tools, we told you about the importance of using them, how to maintain them and which ones are the most common. In this case, you’ll need some simple tools.
You’ll find helpful a sharp straight-bladed knife used for pruning and grafting. In case the cuttings are woody or semi-woody, you can use pruning shears. The important thing is to keep these tools clean to prevent the transmission of diseases to the plants.
When planting the cuttings, you can use planters of different sizes to make holes in the soil. In case you don’t have one, a pencil will also work.
Techniques for propagating cuttings
As I mentioned earlier, cuttings can be taken from different parts of the mother plant and can be herbaceous, woody or semi-woody species. Below, I’ll explain each of these forms.
Herbaceous cuttings
These cuttings are taken from the tip or top of the mother plant’s young shoots. For shrub and tree plants, you can take the cuttings in spring, and for herbaceous plants, you can do it before spring, protecting the cuttings.
These types of cuttings, belonging to the same plant, can root more easily and are also prone to failure. It all depends on the nutrient reserves needed for rooting.
The size of the cuttings may vary from one species to another; however, for most plants, you can take cuttings between 5 and 7 cm long. There are exceptions still, for, in the case of heathers, 2 cm cuttings are sufficient.

Herbaceous cuttings can adhere to the substrate or soil outdoors; however, it’s advised that you plant them in protected settings such as boxes, containers, or trays.
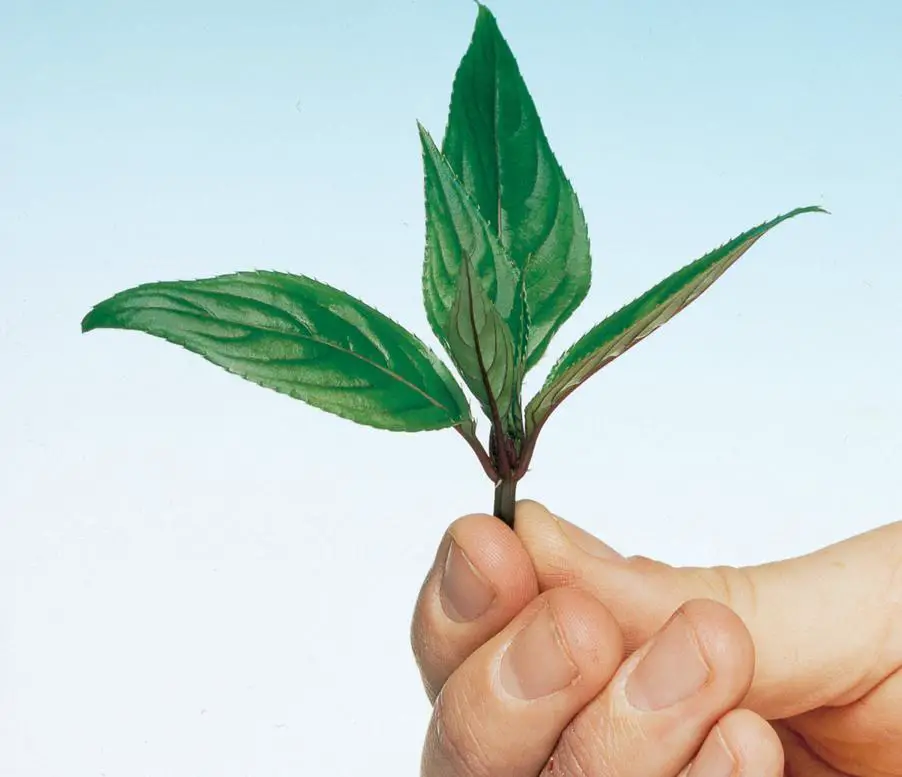
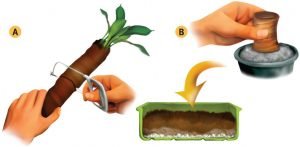
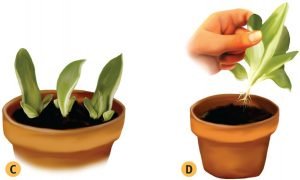
As mentioned earlier, you can trim herbaceous cuttings with a knife or garden shears. The cut should be diagonal and, always, below a fully formed bud, as shown in the image of the Impatiens New Guinea cutting.
Once you have the cuttings, it’s necessary to remove the bottom leaves and sometimes the top leaves. This way, you’ll only keep the middle leaves which, through photosynthesis, will help the roots to grow.
You should plant the cuttings as soon as possible, and in case you can’t, you can store them for a maximum of 24 hours. You can use newspaper or containers to store them so that they don’t lose their firmness and don’t transpire too much.
In case your cuttings have some rooting difficulties, you can apply rooting hormones. For planting them, you need to make a hole in the substrate and sow them approximately ⅓ of the length of the cutting. Be careful not to break, bend or damage the end of the cutting you are planting.
Semi-hardwood cuttings
These cuttings are used in multiplying shrubby plants such as azaleas and conifers such as pines. They have the capacity to retain more reserve substances, including nutrients, which enable them to survive until the roots emerge.
You can take this type of cuttings in summer, from June to September. For some species, such as hydrangeas and camellias, the best cuttings are the tender ones that are easily extracted by bending them.
For other species, such as ivy, it’s recommended to take mature cuttings with fully formed leaves; they should be taken in July. These cuttings can develop outdoors, but it’s better to keep them in a sheltered place.
Unlike herbaceous cuttings, semi-woody cuttings take longer to root, approximately 4 to 6 weeks, so they require a good amount of reserve substances. It’s advisable to take cuttings 10 to 15 cm (4 to 6 in.) long and with plenty of leaves.
Cut the cuttings below one of the buds or shoots that are on a slightly lignified stem, that is to say, with woody consistency. Also, remove the leaves from the bottom and top of the cutting.

Do not keep the cuttings unplanted for a long time. Apply rooting hormones and sow up to half their size. Sand and coarse peat will do the trick. Make sure that the leaves don’t get in contact either with the soil or other cuttings’ leaves.
When the weather is too hot, you should keep the substrate slightly moist and under shade. You can use a fungicide at the beginning of the planting to prevent fungus development.
Once the roots have emerged, apply fertilizer to the substrate so that the cuttings can continue to develop. In spring, you can transplant the cuttings either directly into the soil or into a pot.
I recommend removing those cuttings that didn’t come up properly as they won’t have good roots nor an optimal vegetative development.
Hardwood cuttings
This type of cutting is used to multiply shrubs and deciduous trees, i.e. trees whose leaves fall off in autumn, in particular those used for grafting fruit trees. They are also used for ornamental plants such as Camellia and Prunus laurocerasus (cherry laurel).
Hardwood cuttings have difficulty adhering to the place where they are sown. However, they are much more resistant because, as they have no leaves, when deciduous species, they are in a resting period and have several nutrient reserves.
For this reason, the ideal time to take cuttings from the mother plant is during the vegetative resting period, that is, when there is no leaf growth, typically, from October to March.
Make sure that the cuttings are about 20 to 40 cm (8 to 16 in.) long. Depending on the species of plant you want to reproduce, it may or not be able to withstand being outdoors. In this case, the soil must have good drainage, aeration, and organic substances. Otherwise, you’ll have to keep the cuttings in pots and protected from harsh environmental conditions.
To plant them, you must make a hole in the soil at least 20 cm deep, you can add a little sand to ensure good drainage. Place the cuttings in the hole and cover them with the substrate or soil.
You can use hormones to enhance rooting and fungicides to prevent the appearance of the pest. Woody cuttings can take 6 to 8 weeks to root, but the time may vary depending on the plant species.
During the spring, the cuttings will begin to develop leaves and new roots. In autumn, when they are mature and have well-developed roots, you can transplant the cuttings to their final location.
Leaf cuttings
This type of cuttings is used to reproduce, mostly, indoor plants such as Sansevieria, also known as mother-in-law’s tongue. You should choose well-developed and complete leaves so as to take several cuttings.
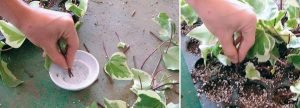
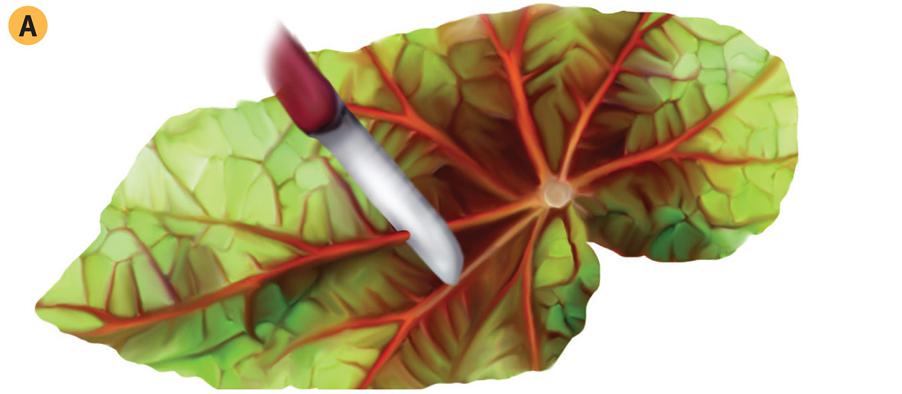
Extend the leaves into the substrate and gently fix them with a wire, as if it were a staple, but without piercing the plant. In species such as Begonia rex, it’s necessary to make several cuts in the veins of the leaves so that more cuttings can emerge.
Once rooting occurs, and new shoots grow, separate the cuttings and plant them out individually.
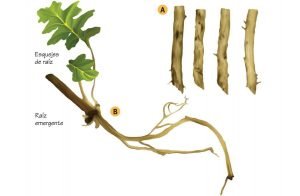
Root cuttings
These types of cuttings are used to propagate perennial and shrubby plants, which have fleshy roots. You should take such cuttings during the vegetative resting period: in autumn and winter, or even early spring.
As they are root cuttings, carefully cut them from the mother plant into 3 to 15 cm (3 to 6 in.) long pieces with a diameter about the same as a pencil. You’ll need to cut the upper part horizontally and the lower part diagonally.
These pieces of roots should be planted in soil or pot, whichever you prefer. Then, cover them with a substrate of equal parts of sand, peat, and garden soil. The time the cuttings will take to germinate depends on the plant species you’re growing.
Once the cuttings have developed their vegetation, you can transplant them to their definite place. Some of the species that reproduce by this kind of cuttings are Rhus typhina (Virginia Sumac), Phlox, Robinia (False Acacia), and Cordyline, to name a few.
Cuttings of Crassia plants
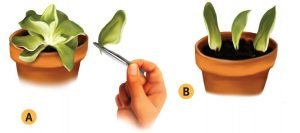
This species of plants, more popularly known as succulents, can be reproduced by seeds, grafting, and also cuttings. The latter method works for those plants that develop shoots rapidly like Aloe, so just take one or several shoots and plant them individually.
Plant the sprouts or leaves of the succulents vertically in the substrate so that they can stay upright. Once they have rooted and developed new shoots, you can transplant them to their final place.
The size of the sprouts will be from 5 to 15 cm (2 to 6 in.) in length and it’s necessary to let them dry for a few hours or a day at the most. Use a fine substrate that allows proper drainage; it can be fine or coarse sand or even a little peat; it all depends on the species of plant that you’re reproducing.
Crassulas can easily adhere to the substrate as long as they are in protected environments where the temperature is approximately 20 to 25 (68 to 77 °F).
Conditions for the development of cuttings
Now that you know the types of cuttings that are available to reproduce or multiply some of your favorite plants, I’ll let you know the necessary conditions for their successful development.
Mulch
This element is helpful for cuttings because, while they are in the rooting process, the mulch or substrate serves to hold them in place. At this point, the cuttings cannot take the nutrients from the substrate because they don’t have the roots responsible for this.
However, the substrate must have sufficient drainage, water retention, and good aeration. You can use river sand, expanded clay, arlite, vermiculite, garden soil, and peat. These latter work as the cutting begins to develop roots and attach to the soil. Don’t forget that transplanting the cuttings to another mulch or substrate is necessary so that they can absorb the nutrients they need.
Broadly speaking, you can help the cuttings to adhere to the substrate by using 1 part of sand, 2 parts of peat, and 1 part of garden soil. You can also use arlite or vermiculite for drainage.
Remember to be aware of the type of plant you’re reproducing and its requirements regarding the substrate. In nurseries or specialized stores, you can find ready-made substrates are ideal for cuttings.
Containers for cuttings
As I mentioned, you can use plastic or terracotta containers to plant your cuttings. Normally, these containers are employed to keep cuttings protected in greenhouses or other spaces.
Depending on the material, you can reuse the containers to plant several cuttings. What you should do is wash them thoroughly to remove any residue that may contaminate and affect the new shoots.
You can sterilize them by soaking them in a solution of 1 cup of bleach diluted with 1/9 liter of water (125 ml) for 5 minutes. Let them dry in a clean environment; you can use them without any problem.
You can also reuse pots or containers to plant your cuttings, as long as they are flawlessly clean and fit the size of the plants.
Rooting
Once again, I have to remind you that factors such as light, temperature, watering, and humidity influence the rooting process of the cuttings. But other factors such as the physiological age of the mother plant and treatments with root hormones are also involved.
Regarding the physiological age of the mother plant, some cuttings can develop their roots more easily if taken from the young parts of the plant. However, the mother plants may have various areas from where cuttings can be taken.
These zones are juvenile, growing, maturing, or aging. You can do the experiment of taking cuttings from various parts of the plant and identify their changes and development. This will also help you distract yourself and learn a little about the wonders of nature.
Regarding hormones to promote rooting, you need to know that another alternative can be considered before using these products. A mechanical treatment that consists of cutting approximately 2 to 3 cm (1 to 2 in.) from the base of the stem of the woody or semi-woody cuttings to allow the roots to appear.
Now, the hormone or chemical treatment aims to guide the scar tissue cells to form the cuttings’ roots. These hormones can be vegetal (natural) or synthesized and are divided into several categories.
In the auxin category are those responsible for the rooting process, as they stimulate the growth of roots and plant tissues.
Environments for cuttings
As we have discussed throughout the blog, while some cuttings can develop in the open field, others require protected environments for that purpose. In these environments, factors such as light, temperature, watering, and diseases, among others, are kept under control.
These are some of the environments that can work for you to provide cuttings with the necessary conditions to develop properly.
Greenhouses
It doesn’t have to be a professional one, you can use a polyethylene bag to cover the cuttings pots or containers. This will help maintain an adequate temperature and humidity, depending on the plant species, especially in very cold climates.

Boxes of reproduction
These are wooden boxes of different sizes with glass or plastic covers that protect the plants from strong winds or rain. They should be located in a place with light and heat, but not too much.
Their base should have holes to allow water drainage. The holes don’t need to be very large, and you can put a mesh to prevent the substrate from clogging them.
As the boxes will be closed, you must monitor the temperature. If it is above 25 C (77 F), it’s necessary to lift the cover to ventilate the cuttings and prevent them from damaging. Once the cuttings are fully developed, they’ll be able to withstand the open air without protection.
Protective covers
This is a type of protection used to maintain relatively high humidity around the cuttings’ leaves. This means that they cover the leaves of the cuttings directly and not the entire container. The cuttings can be covered with plastic or paper to form a kind of mini-greenhouse.
Its use is recommended for short periods because being so close to the leaves, it prevents enough aeration, illumination for photosynthesis and fungi can appear.
Definite planting of cuttings
This process involves two factors. First, the acclimatization of the cuttings, which consists of accustoming the cuttings gradually to their final environment, after it has been secured.
Make sure that the outside temperature is not too high, and that it lowers progressively so that the plant gets used to it. Do not plant the cuttings in places with direct sunlight or use items to provide some shade. Otherwise, they could be affected since they are young shoots.
You can start by taking your cuttings outside for short periods and when the temperature is not so hot. Then gradually increase the time the cuttings spend outdoors.
Try not to expose the cuttings to very cold climates if they are not fully acclimatized; be cautious of drafts and sudden changes in temperature. A tip to assist the cuttings to grow more evenly and to help them acclimatize easily is to add nutrients gradually.
The second process of the final cultivation of cuttings is transplanting into the final location. This step involves taking into account the time needed for plants to root, remember that this varies according to the species.
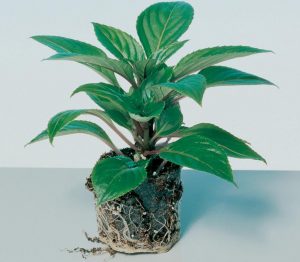
For identifying the state in which the rooting is, you can gently extract some sprouts from the substrate. If the roots are more than 2 or 3 cm (1 or 2 in.) long, you can transplant the cuttings.
The substrate has to be firmly attached to the roots so that they don’t suffer any damage when transplanting, nor does the whole plant. Keep in mind that this procedure must be carried out with great care and patience.
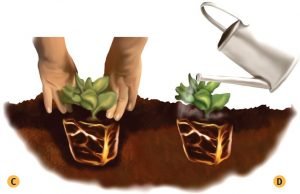
You can transplant the cuttings directly into the soil of your garden or in pots made of different materials, it all depends on your preferences.
If you decide to keep the cuttings in the garden, protect them from strong winds and prepare the soil with mineral and organic fertilizers. Otherwise, if they are to be transplanted in pots, you should use a substrate that meets the plants’ requirements. Broadly speaking, you can use garden soil, peat, and sand. Do not forget also to use fertilizers for potted plants.
Once you have finished transplanting, water moderately to moisten the substrate and compact both the soil and the plant. There is no need for large amounts of water because we don’t want to have puddles.
Pests that can affect cuttings
Remember that when you use a part of the mother plant to reproduce it, that part becomes very vulnerable and prone to be attacked by diseases or pests, so it’s advisable to apply fungicides for preventing them.
Below, I’ll mention some of the diseases that can attack cuttings.
Collar mold
This is a fungus that comes from Pythium and Rhizoctonia. It can cause the lower part of the cutting stem to turn black. It then spreads through the rest of the plant and can affect nearby cuttings.
It can be carried in substrates, poorly sanitized tools, water from contaminated sources, or unsterilized containers. This disease uses these elements as transport to reach the plant.
It’s, therefore, necessary to keep all the elements clean and sterilized. In case there is a presence of this fungus you should remove all the parts that are affected and use fungicides to prevent the appearance of this disease in other cuttings.
Gray mold
It comes from the fungus Botrytis cinerea and can affect a large number of species. It causes the cuttings’ tissues to decompose and causes the appearance of gray spots that eventually kill the plant.
If you detect this fungus, you need to remove the infected shoots and treat it with fungicides.
Verticillium wilt
It’s caused by the fungus Verticillium alboatrum and causes the leaves of the cuttings to wilt. There is no method or product that can help eliminate this disease, so you must destroy the affected cuttings.
Bacteriosis
These are bacteria that can affect cuttings, causing wilting of the leaves, growth of nodules and tumors on the roots or watery spots under the leaves.
There are no treatments or products that help eliminate these bacteria, thus you’ll have to get rid of the infected cuttings.
Viral diseases
These diseases can manifest themselves in various ways, the most common include yellowing, foliar spots, loss of vigor, leaf contortions, pale veining (striping), and mosaic (patches of various colors and irregularities).
Infected parent plants can transmit the disease to cuttings that sometimes cannot be detected. Infected cuttings should be removed as there are no treatments for these diseases.
_________________________________________________________
We’ve come to the end of this exciting blog on propagation by cuttings. I hope you’ve found it very useful as it’s a method that will help you reduce time and costs when planting your favorite plants.
Don't forget the recommendations I mentioned so your cuttings can develop in the best possible way. Good luck with your crop!